
Build a No-Code Customer Portal: The Definitive Guide for Service Businesses
If you're a servicebased business, you've likely felt the pain of managing client projects through a chaotic mix of emails, spreadsheets, and shared folders. It's inefficient, insecure, and creates a poor client experience. This guide provides a stepbystep tutorial for building a secure...


If you're a service-based business, you've likely felt the pain of managing client projects through a chaotic mix of emails, spreadsheets, and shared folders. It's inefficient, insecure, and creates a poor client experience. This guide provides a step-by-step tutorial for building a secure, professional no-code customer portal using Airtable as your database and a user-friendly front-end like Softr, empowering your clients with self-service access to their project information.
Key takeaways
- Ditch spreadsheets and email chains for client management to reduce administrative overhead and eliminate security risks.
- Adopt a simple no-code stack: use Airtable as your centralized database (back-end) and a tool like Softr or WeWeb as your client-facing interface (front-end).
- Structure your Airtable base properly before you start building. Create separate, linked tables for Clients, Projects, and Tasks to ensure your data is organized and scalable.
- The most critical feature is secure, permission-based access. Configure your portal so that clients can only see the data specifically associated with their user account.
- Start with a Minimum Viable Portal (MVP) that includes three core features: secure login, a project status dashboard, and a document library. Launch, gather feedback, and iterate.
- Measure success by tracking the reduction in status update emails and an increase in client satisfaction scores, not by the number of features you can add.

Table of contents
- Why Have You Outgrown Spreadsheets for Client Management?
- What Are the Core Components of a Portal Stack?
- How Should You Structure Your Data in Airtable?
- Which Front-End Builder is Right for Your Business?
- Step 1: Connecting Your Airtable Base to a Front-End
- Step 2: How Do You Implement Secure Client Logins?
- Step 3: Building the Main Project Dashboard Page
- Step 4: Adding Key Features Like Updates and File Sharing
- What Are the Essential Security Best Practices to Follow?
- How Do You Measure the Success of Your New Portal?
- Conclusion and Next Steps
- Frequently asked questions
- Additional Resources
Why Have You Outgrown Spreadsheets for Client Management?
Spreadsheets and email quickly become unmanageable as your client base grows, leading to version control chaos and administrative bottlenecks. This manual approach is prone to errors, with critical information easily lost or duplicated across different files and communications.
They also pose significant security risks, as sensitive client information can be accidentally shared or accessed by unauthorized individuals. Sharing client data via email or unencrypted spreadsheets can expose confidential project details, financial information, or personal data, leading to potential breaches and loss of trust.
The client experience suffers when they have to hunt through email threads for updates or access outdated information in a shared file. A disjointed client experience can lead to frustration, missed deadlines, and a perception of disorganization, impacting your business's reputation.
Manual data entry and status updates are time-consuming for your team and prone to human error, diverting resources from billable work. Your team spends valuable time searching for information, reconciling data, and responding to repetitive inquiries, rather than focusing on core service delivery.
What Are the Core Components of a Portal Stack?
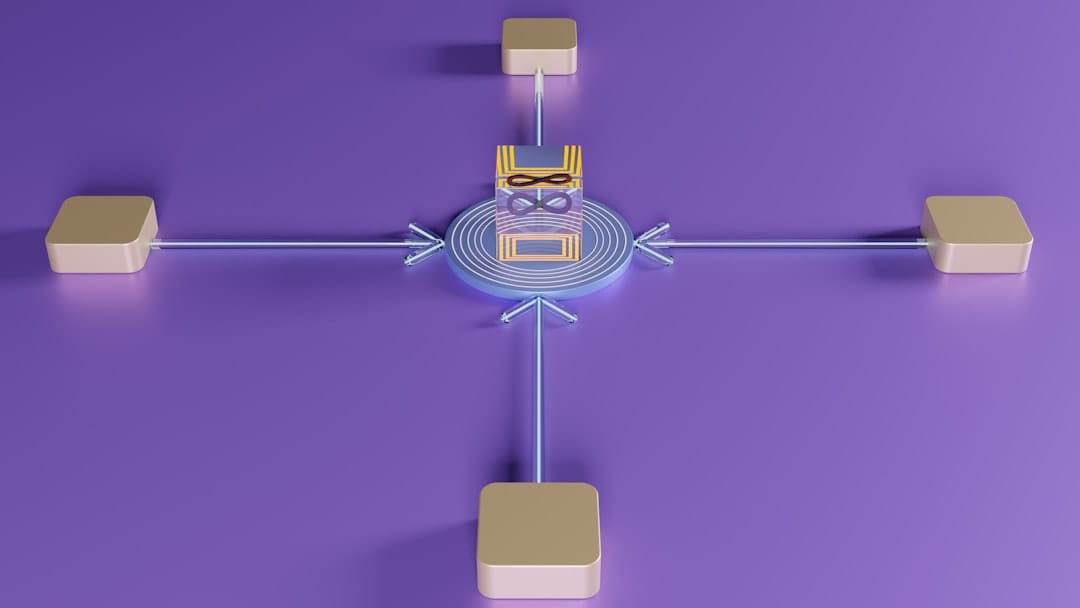
A no-code portal consists of two main parts: a back-end database that stores your data and a front-end application that displays it to users. This separation ensures your data is organized and accessible while your client interface is intuitive and user-friendly.
Your back-end is the single source of truth; for this tutorial, we'll use Airtable to house all client, project, and task information. Airtable's spreadsheet-like interface combined with database capabilities makes it an ideal central hub for your business data.
Your front-end is the interactive website your clients log into; we'll focus on tools like Softr or WeWeb that connect to Airtable and build the user interface. These platforms provide visual editors that allow you to design the client-facing part of your portal without writing code.
An API (Application Programming Interface) acts as the secure bridge that allows the front-end to request and display the correct data from the back-end. The API ensures that data is fetched and presented securely and efficiently, acting as the intermediary between your database and your client portal.
Conceptual architecture showing data flow from the Airtable backend, through an API, to the front-end application, and finally to the end-user.
How Should You Structure Your Data in Airtable?
A proper data structure in Airtable is the foundation of a functional portal, so you should start by creating three essential tables: 'Clients,' 'Projects,' and 'Tasks.' This structured approach prevents data silos and ensures that relationships between different pieces of information are clear.
In the 'Clients' table, include fields for Name, Company, and Email (this email will be their login). This table acts as the central directory for all your clients, holding their identifying information and contact details.
In the 'Projects' table, create fields for Project Name, Status, and a 'Link to another record' field connecting each project to a client in the 'Clients' table. This establishes a clear link between a client and the specific projects you are managing for them, allowing for easy filtering.
Use a 'Tasks' table to list individual deliverables, linking each task to its corresponding project to create a clear hierarchy of information. This granular breakdown allows for detailed tracking of progress on each project, providing clients with specific insights into what's happening at a task level.
Which Front-End Builder is Right for Your Business?
Choosing the right front-end builder depends on your technical comfort and need for customization, with Softr and WeWeb representing two excellent options. Each offers a unique balance of ease of use and powerful customization, catering to different business needs and skill sets.
Softr is ideal for beginners, offering a template-driven approach and tight integration with Airtable that allows you to build a functional portal in hours. Its visual interface and pre-built blocks significantly reduce the learning curve, making it accessible for those with limited web design experience.
WeWeb provides greater design freedom and the ability to build more complex custom logic, making it suitable for those who want more control than templates allow. It offers a more robust development environment for those who require highly customized features and more intricate data handling.
FeatureSoftrWeWebEase of UseVery High (Template-driven)High (Visual editor with more control)CustomizationHigh (Block-based, good Airtable sync)Very High (Full visual control, code export)Learning CurveLowModerateIdeal Use CaseQuick setup, Airtable-centric portalsComplex logic, custom branding, scalingIntegrationsPrimarily Airtable, Google Sheets, etc.Connects to any API, database, or backend

Step 1: Connecting Your Airtable Base to a Front-End
The first step in building your portal is to establish a secure connection between your Airtable database and your chosen front-end tool, like Softr. This connection is crucial for enabling the real-time synchronization of data between your backend and frontend.
Within your Softr dashboard, you will add a new data source and select Airtable, which will prompt you to provide your Airtable API key. This key acts as a password, authenticating your Softr application with your Airtable account, ensuring secure data access.
To find your API key, navigate to your Airtable account settings, and copy the key from the API section. It's important to keep this key private, as it grants access to your entire Airtable account.
Once authenticated, you can select the specific Airtable base and tables (Clients, Projects, etc.) you want to use in your application. Softr will then pull in the schema from these tables, allowing you to map them to your portal's design.
Step 2: How Do You Implement Secure Client Logins?
You can create a secure, private portal by configuring your front-end tool to use your Airtable 'Clients' table as the user database. This ensures that only authenticated users can access their relevant information.
In your front-end's user settings (e.g., Softr's 'Users' tab), map the login functionality to your Airtable base, specifying the 'Clients' table. You'll designate fields like 'Email' for login and potentially 'Password' (though often managed via sign-up links or authentication services for simplicity).
Set up conditional visibility rules on your app's pages and data blocks, adding a filter like: 'Show records where the logged-in user's email matches the 'Email' field in the 'Projects' table's client lookup.' This critical step ensures that when a client logs in, the portal automatically filters all data to show only the projects and tasks associated with them.
For example, if Client A logs in, they will only see projects linked to Client A's email address in Airtable, not any projects belonging to Client B. This granular control is paramount for data privacy and security.

Step 3: Building the Main Project Dashboard Page
The project dashboard is the most important page of your portal, providing clients with a centralized, at-a-glance view of all their active and past projects. This page should be intuitive and informative, offering a clear overview of their engagement with your business.
In your front-end editor, add a dynamic list block and configure its data source to be your 'Projects' table from Airtable. This block will dynamically populate with project data from your Airtable base.
Map the fields from Airtable to the visual elements on the page, such as displaying the 'Project Name' as the list item title and the 'Status' field as a colored tag. This visual representation makes it easy for clients to quickly understand the status of each project.
Add a search bar and filter options (e.g., filter by 'Status') to make it easy for clients with multiple projects to find what they need quickly. This enhances usability, allowing clients to efficiently navigate and locate specific project information without excessive scrolling or searching.
Step 4: Adding Key Features Like Updates and File Sharing
You can easily add an updates log or file-sharing capabilities by leveraging Airtable's native features within your portal's detail pages. This extends the functionality of your portal beyond just status updates, offering a more comprehensive client experience.
To display files, add an 'Attachments' field to your 'Projects' or 'Tasks' table in Airtable and simply drag-and-drop your client files into it. Airtable's attachment field is versatile and can handle various file types, from documents and images to videos.
In your front-end builder, add a file gallery block on the project detail page and link it to the 'Attachments' field to display the files. This makes it easy for clients to access all relevant project documents directly within the portal.
For project updates, you can use an Airtable 'Comments' field or a linked 'Updates' table, then display this feed in your portal to show a running log of communication. This provides a transparent and organized record of project developments and discussions.
A typical workflow might look like this: A client logs in, clicks on a specific project from their dashboard, views a list of associated tasks, accesses any attached files, and reviews the latest status updates or comments.
What Are the Essential Security Best Practices to Follow?
Beyond basic logins, robust security for your portal requires configuring precise data visibility rules to prevent any potential data leaks between clients. This ensures that each client only ever sees information pertaining to their own projects and data.
Always double-check your page and block-level permissions in the front-end tool to ensure that every piece of data is correctly filtered for the logged-in user. Implement rules that filter data based on the logged-in user's email or a unique client ID, ensuring isolation.
Never expose your full Airtable API key on the front-end; use the secure authentication methods provided by tools like Softr, which handle this on the back-end. Storing sensitive keys securely prevents unauthorized access to your entire database.
Regularly review user access and audit your portal's permissions, especially when adding new features or changing your data structure in Airtable. This proactive approach helps maintain a secure environment and quickly identify any potential vulnerabilities or misconfigurations.
How Do You Measure the Success of Your New Portal?
The success of your customer portal is measured by how effectively it solves the initial business problems of inefficiency and poor client experience. It's about tangible improvements in operational flow and client satisfaction, not just feature deployment.
Track key operational metrics, such as a measurable decrease in the number of emails and phone calls from clients asking for routine status updates. A reduction in these inquiries indicates that clients are finding the information they need independently within the portal.
Solicit direct feedback from your clients through surveys or informal check-ins to gauge their satisfaction and identify areas for improvement. Understanding their experience and their perception of the portal's usefulness is crucial for ongoing development.
Utilize a simple framework to confirm launch readiness and ongoing health, checking off items related to data accuracy, security, and user experience. This checklist ensures that the portal is not only functional but also reliable and user-friendly.
Portal Go-Live & Health Check
- Data Accuracy: All client and project data is correctly synced from Airtable and displays accurately to clients.
- User Permissions Tested: Clients can only view their own data; test with multiple client accounts.
- Login/Logout Functionality: Client login and logout processes are smooth and secure.
- Core Feature Functionality: Project dashboard, task lists, and document viewing work as expected.
- Security Protocols Verified: API keys are not exposed, and data display rules are correctly implemented.
- Client Feedback Channel Open: A clear method for clients to provide feedback and report issues is established.
- Performance Monitoring: Portal loads quickly and responsively across different devices.
Conclusion and Next Steps
You've learned how to transition from inefficient spreadsheet management to a professional, no-code customer portal. By leveraging Airtable for data organization and a tool like Softr for the client-facing interface, you can empower your clients with self-service access, reduce administrative burdens, and enhance overall client satisfaction. Remember that a well-structured database and secure access controls are paramount for a successful portal.
Start by focusing on the core features that address your primary pain points. Launching a Minimum Viable Portal (MVP) allows you to gather real-world feedback and iterate based on client needs, ensuring your portal evolves to meet your business objectives.
Here are your next actionable steps:
- Structure your Airtable base: Before building the portal, ensure your Airtable tables (Clients, Projects, Tasks) are properly linked and contain all necessary fields.
- Choose your front-end tool: Select Softr for speed and ease of use, or WeWeb for greater customization potential.
- Connect your data source: Authenticate your Airtable base with your chosen front-end platform.
- Implement secure logins: Configure user authentication using your client list in Airtable.
- Build essential pages: Create your project dashboard and detail pages, mapping Airtable fields to visual elements.
- Test thoroughly: Have a few trusted clients test the portal for usability, security, and functionality before a wider rollout.
Frequently asked questions
How much does it cost to build a no-code portal?
The cost of building a no-code portal is primarily determined by the subscription fees for the tools you use, such as your Airtable plan and your front-end builder's plan (e.g., Softr, WeWeb). A basic but powerful portal can often be built for under $100-$150 per month, which is a fraction of the cost of custom development. Many platforms offer free tiers or trials to get started.
Can my clients upload files and submit information?
Yes, absolutely. Most no-code front-end tools allow you to create forms that write data back to Airtable. This capability enables clients to submit support tickets, upload project documents, update their contact information, or provide feedback directly through the portal, all of which can be captured in your Airtable database.
How long does it take to build a basic customer portal?
With a well-structured Airtable base and a user-friendly tool like Softr, a service business can typically build and launch a functional Minimum Viable Portal (MVP) with core features, such as secure login, project status, and file access, within a single weekend. More complex portals may take a week or two.
Can I customize the portal with my company's branding?
Yes, customization is a key benefit of no-code portal builders. All major platforms allow you to customize logos, color schemes, fonts, and overall layout to match your company's brand identity, ensuring a consistent and professional client experience.
Is a no-code customer portal secure?
Yes, when configured correctly. Security relies on the robust user authentication provided by the front-end tool and the strict permission rules you establish to ensure users can only access their own data from the back-end database. By limiting data visibility and using secure authentication, your portal can be highly secure.
What's the difference between a client portal and a CRM?
A CRM (Customer Relationship Management) system is primarily an internal tool for your sales, marketing, and support teams to manage customer interactions, track leads, and organize sales pipelines. A client portal, on the other hand, is an external, client-facing application that allows customers to self-serve, access their specific project information, and interact with your business directly through a secure interface.
What are the main limitations of this no-code approach?
The primary limitations of a no-code approach can include dependency on the platform's specific features and integrations, potential performance issues with extremely large datasets (tens of thousands of records) or highly complex query needs, and less flexibility for highly unique or custom workflows compared to traditional custom coding. However, for most SMB needs, these limitations are manageable.
Can the portal send automated email notifications?
Yes, automated notifications are a common feature. This is typically achieved by connecting your no-code stack to an automation tool like Zapier or Make. You can create workflows that trigger an email notification when a project status changes in Airtable, a new file is uploaded, or a task is completed, keeping clients informed proactively.
How should I onboard my clients to the new portal?
Start with a small group of friendly clients to test the portal and gather initial feedback. Then, create a simple onboarding email that clearly explains the benefits of the portal, provides a direct login link, and includes a short video or guide demonstrating how to use its main features, such as checking project status or accessing documents.
Can I integrate payment processing?
Yes, this is often possible with no-code tools. Many platforms integrate with payment gateways like Stripe or PayPal. You can embed payment links, create invoice pages, or add buttons within your portal, allowing clients to view and pay invoices directly, streamlining your billing and collections process.
Additional Resources
Watch
- How to Build a Customer Portal With AI and No Code — 27 Oct 2025 — customers constantly asking for updates files endless details Well build a no code customer portal with AI that's fully scalable. ...
- Create a Client Portal with No Code in 2 Minutes Using @glideapps — 3 Jul 2023 — ever wished you could create a portal to share critical. project information with your clients effortlessly. well you are in luck ...


